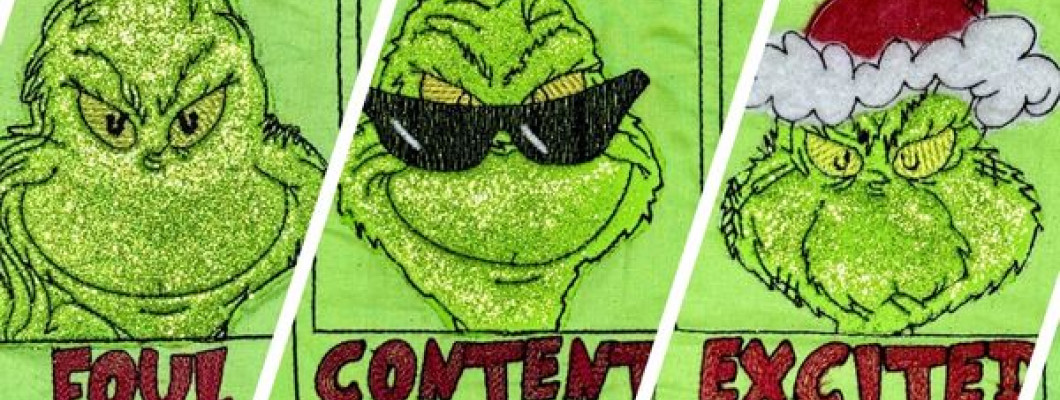
Today's another great to start something fresh, new, and well a little devious. These are the project instructions for our Latest 'Many Moods of the Christmas Thief' (also known as The Grinch) - Machine Embroidery Panel. A Perfect Pack of 10 Devilishly Cute Embroidery Designs to create a Perfect Hanging Panel.
Project Overview
We are creating a high-quality fabric wall hanging Grinch mood board by using an embroidery machine to apply nine appliqué Grinch faces. The machine will stitch the placement lines (or die lines), tack down the appliqué pieces, and sew the detailed facial expressions and mood names.
Dimensions & Layout
It is crucial to mark the project accurately before beginning. Your final panel will have the following layout:
Complete Project Size: 20" x 10"
Title Section: 5" x 10" area for the text "The Many Moods of Grinch".
Grinch Grid Section: 15" x 10" total area for the nine faces.
Individual Mood Cell: The grid is divided into 9 cells, making each 4.5" x 5".
Design Note: Ensure your digitized Grinch files are sized to fit comfortably within these 4.5" x 5" cell dimensions.
Required Materials & Tools
- Background Fabric (Cotton/Canvas): A piece larger than the final project, at least 24" x 14".
- Stabilizer: A mid-weight cut-away stabilizer.
- Glitter Foam Sheet: Green color for all the Grinch faces.
- Felt: Red for the Santa hats.
- Temporary Spray Adhesive: Apply to the back of the foam and felt before placing it on your fabric.
- Embroidery Machine Thread: 40 wt Rayon thread - Multiple Colors to suit our Project's colors.
- An Embroidery Machine (duh!)
- Digital Embroidery Files: Digitized appliqué files for the faces and title. Get them by clicking here.
- USB Stick: To transfer design files to your machine.
- A Pair of Scissors: Appliqué or curved embroidery scissors.
- Standard Sewing Supplies: Iron, ironing board, fabric marker, ruler, rotary cutter, etc.
Project Instructions
Step 1: Fabric Prep & Marking
Prepare your oversized background fabric (24" x 14"). Using a fabric marker, carefully draw the layout onto your fabric: the 5" x 10" title section and the 15" x 10" grid section. Inside the grid, mark the center point for each of the nine 5" x 3.33" cells. This marking is essential for accurate hooping and alignment.
Step 2: Embroider Each Mood Design
You will stitch one Grinch face at a time, re-hooping for each one. The process for each face is as follows:
- Hoop Your Fabric: Securely hoop your fabric with cut-away stabilizer, ensuring the first marked position is centered.
- Stitch Placement Line: The machine will sew a "die line" or outline onto the fabric.
- Place & Tack Down: Place the corresponding foam or felt piece over the outline. The machine will then sew a tack-down stitch to secure it.
- Trim: Carefully remove the hoop from the machine (do not un-hoop the fabric) and trim the excess appliqué material from around the tack-down stitch.
- Finish Stitching your Design: Return the hoop to the machine. It will complete the design by sewing the final decorative border, the facial expression, and the mood name.
- Repeat: This process repeats for all nine moods, carefully re-hoop the fabric for each design.
Step 3: Final Assembly
Once all nine faces are embroidered, remove the project from the hoop. Trim the excess cut-away stabilizer from the back of the panel. Now, cut the completed panel down to its final size (20" x 10"). Finally, sew the front panel to your backing fabric (adding a hanging sleeve as desired) to complete your wall hanging.
Each design included in the pack is available in multiple sizes and formats so, it is perfect for hoops of different sizes. You can use the designs as you desire and create all sorts of projects using this Pack. You can create mats, face tiles, or wall decorations. Sky's the limit so feel free to use these designs however you please because I know whatever you choose to create will be incredible. Just don't forget to take pictures and share it with me!
Happy Sewing & Embroidering!


-250x250.png)














-250x250.jpg)




Leave a Comment