02 Aug
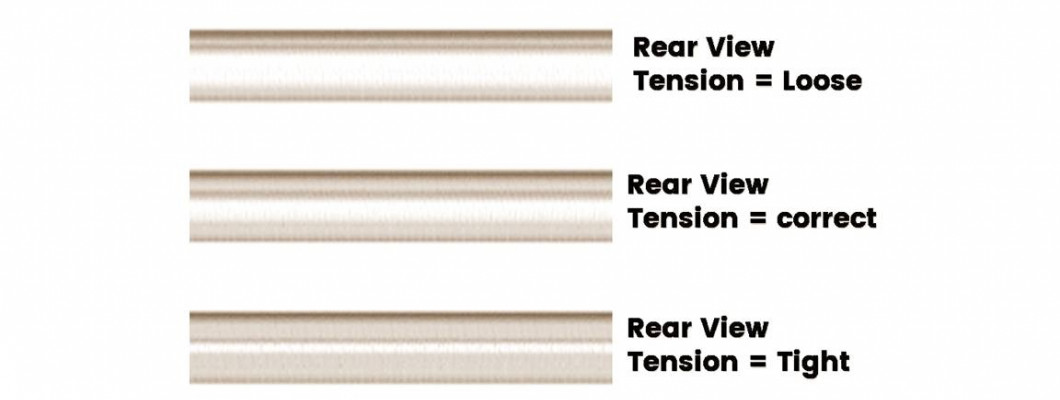

We always start out our guides by first clearing the topic so that we start right from the beginning; easy and nice. What really is tension in a sewing machine and why do you need to adjust it? Are you on the right road to solving your problem? Let’s start by first taking a look at this embroidery tension chart to determine if it is really tension that we need to know or learn more about!
Embroidery Tension Chart
A Machine's Tension sometimes gets too tight or too loose which can cause the stitching to look horrible. Here's a general look on the situation.

Now that we have a general idea of our problem, it is time that we move forward. We will sum the basics up in a few sentences and then move onto resolving the tension problem in your machine!
What is Tension “T” in a sewing machine?
Tension in a sewing machine is the needle and bobbin threads control to form balanced stitches. It ensures to keep your stitching even on both sides of the material.
Is maintaining the correct tension really important?
YES. Correct sewing machine tension allows you to have balanced stitching which keeps your stitching line perfect and the fabric correctly woven. It is extremely important!
Diagnosing the tension problem
First of all, you need to check for other potential problems. Before starting out the procedure, you need to ensure that it is a tension problem that you are facing instead of something else.
Sometimes other problems look like the tension problem so firstly, make sure that:
- your bobbin is inserted correctly.
- the machine is clean so there are no interruptions because of dirt or debris.
- the needle is not bent or other parts of the machine are not roughed out or damaged. Inspect your machine keenly.
- all the essentials (fabric, needle, and thread) that you are using are compatible with one another.
After the keen inspection, you will know if it is tension or something else that is the problem. You can do a small test as well and we will explain to you how.
How to do a small “T” test?
Take a small piece of fabric and sew a seam or two to check the stitching. Examine your seams carefully. A perfect stitch would not have any sort of loops, skips, or puckering.
The thread on both sides should be equally and evenly pulled by the needle and the bobbin so that the stitch is perfect. If one is pulling more than the other then that means there is a tension problem.
To make it easy to understand:
Bobbin thread showing up on the top side + the top thread stays straight = upper T is too tight.
Top thread showing up on the underside + the bobbin thread stays straight = upper T is too loose.


Adjusting the Top Tension
The tension regulating dial is now what you have to focus on. Check your manual if you cannot find it. If still not, then it is just a dial with numbers on it.
If the tension is too tight, turn down the dial so that the number decreases. Only decrease the number gradually (1/2 or 1 less) and test it on fabric. Continue till the stitch is even on both sides.
OR
If the tension is too loose, turn up the dial so that the number increases. Only increase the number gradually ( ½ or 1 more) and test it on fabric. Continue till the stitch is even on both sides. If it is not getting even, you would need to adjust the bobbin tension.
Adjusting the Bobbin Tension
If you still require adjusting the bobbin tension after doing all that, then we need to get to it. The testing is only a bit different for the top drop-in bobbin and the bottom loading bobbin.
For a Bottom Loading Bobbin
Take the hanging thread from the bobbin case in your hand, if it does not unroll then that means the T is too tight. If it unrolls like butter, then the T is too loose. When the tension is perfect, the thread only drops a few inches.
Using a small screwdriver, turn ¼ (0.25 revolutions) the screw. To increase the tension, turn it to right side. To decrease the tension, turn it to the left side. You can keep testing it until the thread only goes down a few inches.
For a Top Drop-in Bobbin
Do the whole process of the screwdriver; turn right to tighten and left to loose. You would need to test its tension by stitching on a piece of fabric.
Final Step: Keep Testing!
You would need to keep testing the tension of your sewing machine on fabric until you reach the perfect tightness; meaning even stitches on both sides! If you think that tension is not the problem in the first place then please leave the regulators alone or you would have to go through such a long process for nothing!
Sometimes, the only problem with the machine is that it is not getting the proper maintenance that it needs. Make sure that you are keeping your machine well-maintained and clean. We have guides on how to properly maintain a sewing or embroidery machine, check them out so you can keep your machine in good shape!
We hope that you understood what tension in a sewing machine really is and how to resolve such problems that come up!
Have Fun Sewing & Embroidering!




-250x250.png)













Leave a Comment